Essential Home Maintenance: 6 Tasks to Prevent Costly Repairs This Year

Anúncios
Essential Home Maintenance: 6 Tasks to Prevent Costly Repairs This Year
Owning a home is a significant investment, and like any investment, it requires diligent care and attention to maintain its value and functionality. Often, homeowners only think about maintenance when something breaks, leading to unexpected expenses and considerable stress. However, adopting a proactive approach to home maintenance tasks can save you thousands of dollars in the long run and ensure your home remains a comfortable and safe haven for years to come.
The truth is, many major home repairs stem from neglected minor issues. A leaky faucet might seem insignificant, but over time, it can lead to water damage, mold growth, and compromised structural integrity. Similarly, clogged gutters can cause foundation issues, and an unserviced HVAC system can drastically reduce its lifespan and efficiency. By understanding and implementing essential home maintenance tasks, you can identify and address these small problems before they escalate into costly catastrophes.
This comprehensive guide will walk you through six critical home maintenance tasks that every homeowner should prioritize this year. These tasks are designed to cover various aspects of your home, from its exterior defenses to its internal systems, providing a holistic approach to preventative care. By dedicating a little time and effort to these areas, you’ll not only avoid expensive repairs but also enhance your home’s energy efficiency, improve its indoor air quality, and boost its overall curb appeal and market value.
Let’s dive into the specifics of these crucial home maintenance tasks and discover how a little foresight can go a long way in protecting your most valuable asset.
1. Inspect and Clean Gutters and Downspouts Annually
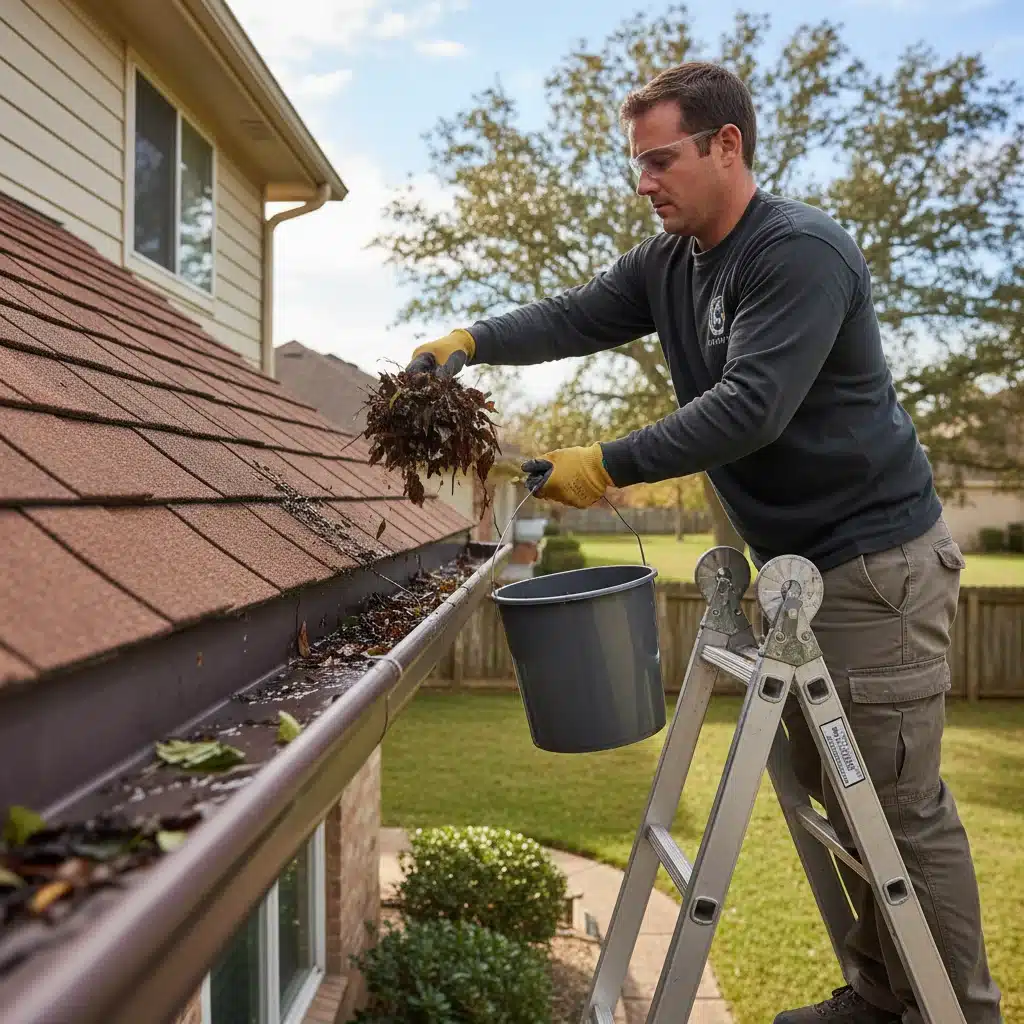
One of the most frequently overlooked yet critically important home maintenance tasks is the regular inspection and cleaning of your gutters and downspouts. These seemingly simple components play a vital role in protecting your home’s foundation, siding, and landscaping from water damage. When gutters become clogged with leaves, twigs, and other debris, they can’t effectively channel rainwater away from your house. This leads to a cascade of potential problems that can be incredibly expensive to fix.
Why Gutter Maintenance is Crucial
- Foundation Damage: Overflowing gutters can cause water to pool around your home’s foundation. Over time, this water can seep into the soil, leading to hydrostatic pressure against the foundation walls. This pressure can cause cracks, leaks in your basement or crawl space, and even structural damage, which are among the most costly repairs a homeowner can face.
- Siding and Exterior Damage: Water consistently spilling over the sides of clogged gutters can run down your home’s siding, leading to rot, mold growth, and discoloration. It can also damage window frames and doors, compromising their seals and leading to further moisture intrusion.
- Landscaping Erosion: The uncontrolled flow of water can erode your landscaping, washing away mulch, damaging plants, and creating unsightly trenches in your yard.
- Roof Damage: If water backs up in your gutters, it can sit against your roofline. In colder climates, this can lead to ice dams, which can lift shingles, cause water to seep under the roof, and lead to extensive interior damage.
- Pest Infestations: Clogged gutters provide a damp, sheltered environment that is appealing to various pests, including mosquitoes, rodents, and insects, which can then find their way into your home.
How to Perform This Home Maintenance Task
Ideally, gutters should be cleaned at least twice a year: once in the late spring after tree pollen and small debris have fallen, and again in the late fall after all the leaves have dropped. In areas with heavy tree cover, more frequent cleaning might be necessary.
- Gather Your Tools: You’ll need a sturdy ladder, heavy-duty gloves, a small scoop or trowel, and a bucket for debris. A garden hose is also essential for flushing.
- Safety First: Always ensure your ladder is stable on level ground. If working at heights makes you uncomfortable, consider hiring a professional.
- Remove Debris: Starting from one end, manually remove all leaves, twigs, and muck from the gutters. Place the debris into your bucket for easy disposal. Pay close attention to downspout openings, as these are common choke points.
- Flush with Water: Once all visible debris is removed, use a garden hose to flush water through the gutters and downspouts. Watch for water flowing freely from the bottom of the downspouts. If water backs up or doesn’t flow, you likely have a clog further down the downspout that needs to be dislodged with a plumber’s snake or by disassembling the downspout sections.
- Inspect for Damage: While cleaning, inspect the gutters for any signs of damage, such as cracks, loose fasteners, or sagging sections. Ensure they are securely attached to the fascia board and sloped correctly towards the downspouts.
Regular gutter cleaning is one of the most cost-effective home maintenance tasks you can perform to prevent far more significant and expensive problems down the line. Don’t underestimate its importance!
2. Test Smoke and Carbon Monoxide Detectors Monthly and Replace Batteries Annually
While not a structural or aesthetic concern, the functionality of your smoke and carbon monoxide (CO) detectors is paramount for the safety of your family and home. These devices are your first line of defense against fires and the silent killer, carbon monoxide. Including this as a regular home maintenance task is non-negotiable.
Why Detector Maintenance is Crucial
- Fire Safety: Smoke detectors provide early warning of a fire, giving occupants precious time to evacuate safely. A non-functional smoke detector can have catastrophic consequences.
- Carbon Monoxide Poisoning Prevention: Carbon monoxide is an odorless, colorless, and tasteless gas produced by incomplete combustion in appliances like furnaces, water heaters, and gas stoves. Without a CO detector, its presence can go unnoticed, leading to severe illness or death.
- Legal Requirements: Many local building codes and insurance policies require functional smoke and CO detectors in homes.
How to Perform This Home Maintenance Task
Maintaining these life-saving devices involves two simple, yet critical, steps:
- Monthly Testing: Every month, press the ‘test’ button on each smoke and CO detector. You should hear a loud alarm sound. If it doesn’t sound, replace the batteries immediately. If it still doesn’t work after battery replacement, the unit needs to be replaced. Choose a specific day each month, like the first day, to make it a routine.
- Annual Battery Replacement: Even if your detectors appear to be working, batteries should be replaced at least once a year. A good practice is to do this when you change your clocks for Daylight Saving Time. For detectors that are hardwired, they usually have a backup battery that also needs annual replacement.
- Detector Replacement: Smoke detectors typically have a lifespan of 10 years, and carbon monoxide detectors usually last 5-7 years. Check the manufacturer’s date on the back of each unit and replace them according to the recommended schedule, regardless of whether they seem to be working.
- Placement: Ensure you have enough detectors strategically placed throughout your home. Smoke detectors should be on every level of your home, inside and outside sleeping areas. CO detectors should also be on every level, especially near sleeping areas and where fuel-burning appliances are located.
These simple home maintenance tasks take only a few minutes but can literally mean the difference between life and death. Make it a priority.
3. Inspect and Clean HVAC Filters and Ducts Quarterly
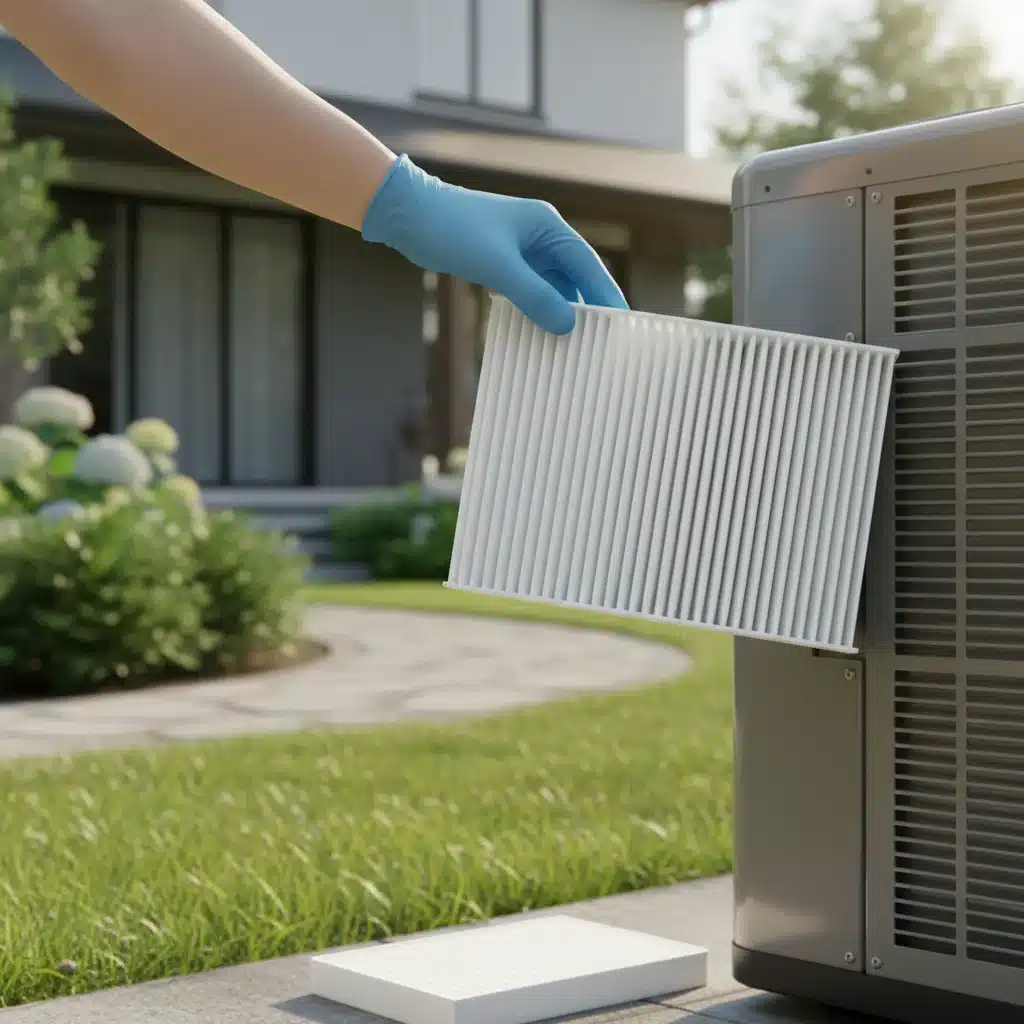
Your Heating, Ventilation, and Air Conditioning (HVAC) system is one of the most expensive appliances in your home. It’s responsible for maintaining comfortable temperatures and good indoor air quality. Regular inspection and cleaning of its filters and ducts are essential home maintenance tasks to ensure its efficiency, longevity, and your family’s health.
Why HVAC Maintenance is Crucial
- Energy Efficiency: A dirty filter restricts airflow, forcing your HVAC system to work harder to heat or cool your home. This increased effort translates directly into higher energy bills. A clean filter allows the system to operate at peak efficiency.
- System Longevity: When the HVAC system is overworked due to dirty filters or clogged ducts, its components experience more wear and tear. This can lead to premature breakdowns and a shortened lifespan for the entire unit, resulting in costly repairs or replacement.
- Indoor Air Quality: Filters are designed to trap dust, pollen, pet dander, mold spores, and other airborne contaminants. A dirty filter can no longer effectively remove these particles, leading to reduced indoor air quality, which can exacerbate allergies and respiratory issues.
- Prevention of Breakdowns: Clogged filters can cause parts of the system to freeze up (in AC units) or overheat (in furnaces), leading to unexpected and inconvenient breakdowns, often during extreme weather when you need your system most.
How to Perform This Home Maintenance Task
The frequency of filter changes depends on several factors, including the type of filter, the presence of pets, allergies, and local air quality. A general guideline is to check and change filters quarterly, but monthly might be necessary for some households.
- Locate Your Filter: HVAC filters are usually found in the return air duct, either at the air handler unit or behind a return air vent.
- Check and Replace Filters: Turn off your HVAC system before replacing the filter. Note the size and airflow direction arrow on your old filter. Remove the old filter and insert the new one, ensuring the arrow points in the direction of the airflow towards the furnace or air handler. Filters should be replaced every 1-3 months, depending on usage and household conditions.
- Inspect Ducts: While cleaning filters, take a moment to visually inspect accessible ductwork for any signs of leaks, dust buildup, or mold. If you see significant dust accumulation or suspect mold, professional duct cleaning may be necessary.
- Professional Servicing: Beyond DIY filter changes, it’s highly recommended to have a professional HVAC technician inspect and service your system annually (typically in spring for AC and fall for heating). They can perform deeper cleaning, check refrigerant levels, inspect electrical components, and ensure the system is running optimally.
Prioritizing these HVAC home maintenance tasks will not only keep your family breathing easier but also save you a substantial amount on energy bills and potential repair costs.
4. Inspect and Seal Windows and Doors for Drafts Annually
Drafty windows and doors are silent energy thieves, allowing conditioned air to escape and unconditioned air to enter your home. Addressing these issues through regular inspection and sealing is a crucial home maintenance task that directly impacts your energy bills and indoor comfort.
Why Sealing is Crucial
- Energy Savings: Air leaks around windows and doors can account for a significant portion of your home’s heat loss in winter and heat gain in summer. Sealing these leaks can lead to substantial reductions in your heating and cooling costs.
- Improved Comfort: Drafts create uncomfortable cold spots in winter and hot spots in summer, making it difficult to maintain a consistent temperature throughout your home. Sealing improves overall comfort.
- Moisture Control: Air leaks can also allow moisture to infiltrate your home, potentially leading to condensation, mold growth, and damage to walls and window sills.
- Pest Prevention: Gaps around windows and doors provide easy entry points for insects and other pests. Sealing these gaps helps to keep unwanted visitors out.
How to Perform This Home Maintenance Task
This home maintenance task is best performed annually, ideally before the extreme temperatures of summer or winter set in.
- Perform a Draft Test: On a windy day, hold a lit candle or an incense stick near the edges of your closed windows and doors. If the flame flickers or the smoke wavers, you have a draft. Alternatively, you can feel for drafts with your hand. Pay close attention to the areas where the frame meets the wall, and where the window/door sash meets the frame.
- Inspect Weatherstripping: Check the weatherstripping around all windows and doors. Look for cracks, tears, or compression that prevents it from creating a tight seal. Replace any damaged or worn-out weatherstripping. There are various types available, including foam, rubber, and V-strip, suitable for different applications.
- Inspect Caulk: Examine the caulk around the exterior of your windows and doors where the frame meets the siding. Look for cracks, gaps, or areas where the caulk has pulled away. Remove old, cracked caulk with a utility knife or caulk removal tool, clean the surface, and apply a fresh bead of exterior-grade caulk.
- Check for Gaps in the Frame: For larger gaps around window and door frames (especially between the frame and the wall), consider using expanding foam sealant. Be careful not to over-apply, as it can deform frames.
- Door Sweeps and Thresholds: For exterior doors, check the door sweep at the bottom of the door and the threshold. If there’s a visible gap when the door is closed, adjust or replace the sweep or threshold to create a tight seal.
By making this one of your regular home maintenance tasks, you’ll create a more comfortable and energy-efficient living environment while protecting your home from moisture and pests.
5. Check and Clean Refrigerator Coils Annually
The refrigerator is one of the hardest-working appliances in your kitchen, running 24/7 to keep your food fresh. Over time, its condenser coils, usually located at the back or underneath the unit, can accumulate dust, pet hair, and debris. Neglecting this simple home maintenance task can lead to decreased efficiency, higher energy bills, and even premature breakdown of the appliance.
Why Refrigerator Coil Cleaning is Crucial
- Energy Efficiency: The condenser coils are responsible for dissipating heat from the refrigerant. When they are covered in dust, they can’t effectively release heat, forcing the compressor to work harder and longer to maintain the desired temperature. This increased workload consumes more electricity, leading to higher energy bills.
- Extended Appliance Lifespan: An overworked compressor due to dirty coils generates more heat and experiences greater wear and tear. Regular cleaning reduces this strain, helping to extend the lifespan of your refrigerator and prevent costly repairs or premature replacement.
- Optimal Performance: A refrigerator with clean coils will maintain more consistent temperatures, keeping your food fresher for longer and preventing spoilage.
- Reduced Repair Costs: Compressor failure is one of the most common and expensive refrigerator repairs. Keeping the coils clean is a simple preventative measure against this common issue.
How to Perform This Home Maintenance Task
This home maintenance task should ideally be performed once or twice a year, or more frequently if you have pets that shed a lot of hair.
- Unplug the Refrigerator: For safety, always unplug the appliance from the wall outlet before you begin.
- Locate the Coils: On most modern refrigerators, the condenser coils are located behind a kick plate at the bottom front of the unit. For older models, they might be on the back. You may need to gently pull the refrigerator away from the wall if the coils are on the back. Consult your owner’s manual if you’re unsure.
- Remove the Cover (if applicable): If the coils are behind a kick plate, you’ll need to remove a few screws or clips to take off the cover.
- Clean the Coils: Use a coil brush (a long, slender brush designed for this purpose) or the brush attachment of your vacuum cleaner to gently remove dust, lint, and pet hair from the coils and the surrounding area. Be thorough, ensuring you get into all the crevices.
- Vacuum the Debris: Use your vacuum cleaner to suck up all the loosened debris from the floor around the coils.
- Replace Cover and Plug In: Once clean, replace any covers, push the refrigerator back into place, and plug it back into the outlet.
This quick and easy home maintenance task can significantly impact your refrigerator’s performance and longevity, saving you money on energy and potential repairs.
6. Inspect Roof for Damaged Shingles and Leaks Bi-Annually
Your roof is your home’s primary defense against the elements. Neglecting its maintenance can lead to devastating water damage, structural issues, and costly interior repairs. Regular inspection for damaged shingles and potential leaks is one of the most critical home maintenance tasks for any homeowner.
Why Roof Inspection is Crucial
- Water Damage Prevention: Even a small crack or missing shingle can allow water to penetrate your roof, leading to leaks in your attic, ceilings, and walls. This can result in mold growth, damaged insulation, electrical hazards, and compromised structural integrity.
- Extended Roof Lifespan: Addressing minor issues promptly can prevent them from escalating into major problems that require extensive and expensive repairs, or even premature roof replacement.
- Energy Efficiency: A damaged roof can compromise your home’s insulation, leading to heat loss in winter and heat gain in summer, increasing your energy bills.
- Protection of Property Value: A well-maintained roof contributes significantly to your home’s curb appeal and market value. Conversely, a damaged roof can deter potential buyers and reduce your home’s worth.
How to Perform This Home Maintenance Task
This home maintenance task should be performed at least twice a year, typically in the spring and fall, and especially after severe weather events like heavy storms, high winds, or significant snowfall.
- Ground-Level Inspection: Start by walking around your home and looking up at your roof with binoculars. Look for:
- Missing or Damaged Shingles: Are there any shingles that are curled, cracked, buckled, or missing entirely?
- Granule Loss: Check for excessive shingle granules in your gutters or on the ground, which indicates aging and wear.
- Loose or Damaged Flashing: Inspect the metal flashing around chimneys, skylights, vents, and valleys. This is a common area for leaks.
- Sagging Areas: Look for any dips or sags in the roofline, which could indicate structural issues.
- Moss or Algae Growth: While not immediately damaging, excessive growth can retain moisture and shorten shingle life.
- Attic Inspection (Interior): With a flashlight, go into your attic during the daytime. Look for:
- Water Stains or Drips: Check rafters, insulation, and the underside of the roof decking for any signs of water intrusion, even old stains.
- Mold or Mildew: Any musty odors or visible mold indicate a moisture problem.
- Daylight: If you can see daylight coming through your roof, you definitely have a leak.
- Professional Inspection: If you’re uncomfortable climbing on your roof or if your ground-level and attic inspections reveal potential problems, it’s always best to hire a qualified roofing professional. They have the expertise and safety equipment to thoroughly inspect your roof and identify issues that might not be visible to the untrained eye.
- Address Issues Promptly: Don’t delay in repairing any identified damage. Even a small leak can cause extensive and expensive damage over time.
Regular roof inspection is one of the most critical home maintenance tasks to protect your entire home from the top down. Investing in this preventative measure will save you from much larger headaches and expenses in the future.
Conclusion: The Value of Proactive Home Maintenance Tasks
As we’ve explored, incorporating these six essential home maintenance tasks into your annual routine is not just about keeping your home looking good; it’s about protecting your investment, ensuring the safety and comfort of your family, and avoiding the dreaded surprise of a costly, emergency repair. From channeling water away from your foundation to safeguarding against silent killers and ensuring your major appliances run efficiently, each task plays a vital role in the overall health of your home.
The initial thought of adding more items to your to-do list might seem daunting, but consider the alternative: the stress of a flooded basement, the discomfort of an HVAC system breakdown in extreme weather, or the financial burden of a complete roof replacement that could have been prevented with timely repairs. By dedicating a small amount of time and effort to these preventative home maintenance tasks, you are actively investing in your home’s longevity and your peace of mind.
Anúncios
Remember, a well-maintained home is not only more enjoyable to live in but also retains its value better over time. Potential buyers are often willing to pay a premium for a property that shows signs of diligent care and attention. So, grab your checklist, set reminders, and make this the year you conquer your home maintenance tasks with confidence and foresight. Your home, and your wallet, will thank you for it.


